Everyone,
Here is a write up of the Intercooler electric fan install on my 99 Lightning:
SPAL 6.5" Electric Fan Install for 1999.5 Ford Lightning
Parts Required:
1 - SPAL 6.5" Fan, Pull, Jaycorp Tech #30100402
1 - Cooling Fan Harness w/Relay, Thermostat and Instructions, Jaycorp #195FH
1 - Fan mounting Pin Kit, Jaycorp #30130013
6' - Gray wire, 18awg
6' - Orange wire, 18 awg
3' - Black wire, 18 awg
8" Heat Shrink Tubing
1 - Radio Shack Mini Toggle Switch, SPST rated 10A @ 125VAC, #275-324B
12' Plastic Wire Loom
Total Cost: $135.00
Tools Required:
Drill, with a 3/16" bit
Wire cutters/strippers
Dykes w/Cutting Edge
Soldering Iron
Tie Wraps, min 6"
Phillips Screwdriver
6" Crescent wrench
Skill Level:
Entry to Mid level. Don't be afraid to drill you dash.
Installation Time:
About 2 hours. Depending on skill level and anal-retentiveness.
Installing the Fan:
Step 1) Raise the front of your Lightning. Be sure to secure in place with Jack Stands.
Step 2) Remove the 5 plastic Phillips screws holding the rear rubber guard to the lower intercooler bracket. Note, I found it easiest to squeeze the tops of the screws and then lightly unscrew.
Step 3.) Take the 4 Fan mounting pins and cut them to about 2 ½".
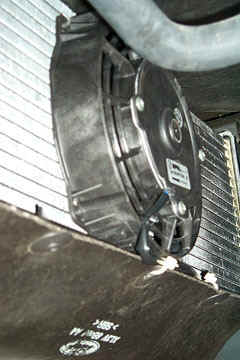
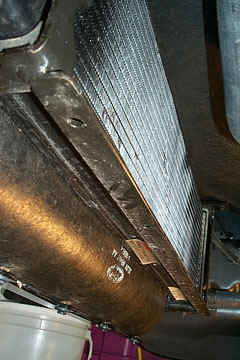
Step 4.) Position the fan at the center of the rear intercooler, as far towards the center top as possible. Note, the intercooler is approximately 22.5" wide. The fan is 7" wide. So position it 7 & ¾" from either side.
Step 5.) Insert the 4 mounting pins in the small holes. One pin should be used in each corner of the fan. Now fold down the rubber guard to allow access to the front of the Intercooler. While holding the rear of the pin, or head, put a supplied rubber washer over the pin and then the supplied fastener clip. The Fastener will fit on tight, so you may need to use pliers to completely slide it on and get a tight fit. BE CAREFUL NO TO DENT/BEND THE INTERCOOLER FINS. Connect the fan wiring harness and let lay under the truck.
Step 6.) Disconnect the battery.
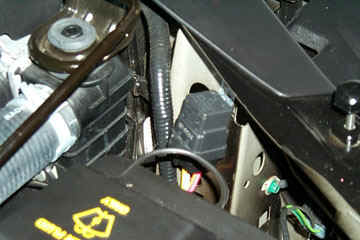
Step 7.) OK, we are ready to install the wiring. On the instructions that come with the Jaycorp relay, they recommend that you mount the unit on the inside firewall. I choose to mount it outside in the engine bay, for ease of service. Note, if you install the relay inside the cabin, you will need to run the Constant power and switch wire to the engine bay. If you install in the engine bay, you will need to run the switch and switched power wire to the cabin. An easy point of entry is the large rubber grommet that holds the boost tube.
Step 8.) Mount the relay to the firewall using the supplied screw.
Step 9.) Run the Constant power (yellow) to a constant power source, such as the battery. You will connect the in-line fuse to the yellow wire using the supplied barrel connector. Crimp.
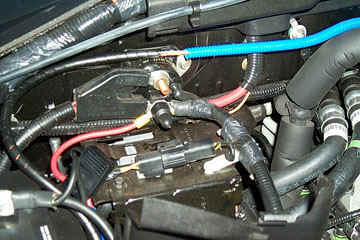
Step 10.) Connect the Red wire (Fan Positive) down to the fan wiring harness. Connect using the supplied barrel connector. Crimp.
Step 11.) Connect the Chassis ground wire from the fan harness to a ground location. Note, there is a good ground point immediately above the Intercooler electric pump. You can identify it by the white plastic insulator. Be careful to not break the insulator. Use the supplied rind connector. Crimp.
Step 12.) This is a good time to warm up the soldering iron. Have a brew, you deserve it.
Step 13.) Solder a 6' extension on to both the switched ignition (use orange) and switch (use gray) wires. Cover with shrink wrap tubing. Run these 2 wires to the back of the engine bay and across to the Boost tube firewall grommet. Insert the 2 wires through the grommet into the cabin. Re-install the grommet if removed.
Step 14.) Enter the cabin and locate the 2 wires. It should appear right above your brake pedal.
Step 15.) Find a location for your switch. I choose to keep it within easy reach of the driver, so I mounted it in the change box, just to the lower right of the steering wheel.
Step 16.) Drill a hole to accommodate the switch location. Test fit the switch. Find a happy position for you. To tighten the switch, you may need to hold it with a crescent wrench.
Step 17.) Connect the gray wire from the engine compartment to one pole on your Radio Shack switch. Connect the orange wire to a switched power source, such as the radio fuse. Note, you can just remove the fuse, insert the wire and re-insert the fuse.
Step 18.) Connect a piece of black wire to a ground source and then solder to the other pole on your Radio Shack switch.
Step 19.) Reconnect the battery. Note, because we connected to a switched power source, you must have the key inserted and turned to the ACC position.
Step 20.) It's time to tie-wrap all wires and cover them with the plastic loom. This will keep the engine compartment "stock" looking and looking good.
Testing the installation:
Step 1) Insert the key and turn to the ACC position. Don't start the truck. Throw the switch. Did the fan come on?? Did nothing happen?? If nothing happened, go back and verify your wiring and that the battery is connected. Troubleshoot until fan operates. If you suspect a bad switch, connect the gray and black wires together.
Step 2) Throw the switch to the off position, verify that the fan stops.
Pros: It moves a lot of air. If you are a racer or sit in a lot of stop and go
traffic, this may help prevent lost boost by keeping the intercooler fluids
cooler. By using the Jaycorp relay, I think electrical system faults will be
avoided. This mod may save a few $$ from doing it yourself. This in conjunction
with the electric pump switch that Sal posted may prove to be an excellent
combination.
Cons: Why wasn't a fan on the truck from the factory??
thats it....Easy DIY...
Later..
------------------
Brian K
kimmel_brian@prc.com
thedink@ix.netcom.com
(Posted with the authors permission, I made minor edits for clarity)